使用canal实现MySQL和ES数据同步
canal简介
canal主要用途是对MySQL数据库增量日志进行解析,提供增量数据的订阅和消费,简单说就是可以对MySQL的增量数据进行实时同步,支持同步到MySQL、Elasticsearch、HBase等数据存储中去。
canal工作原理
canal会模拟MySQL主库和从库的交互协议,从而伪装成MySQL的从库,然后向MySQL主库发送dump协议,MySQL主库收到dump请求会向canal推送binlog,canal通过解析binlog将数据同步到其他存储中去。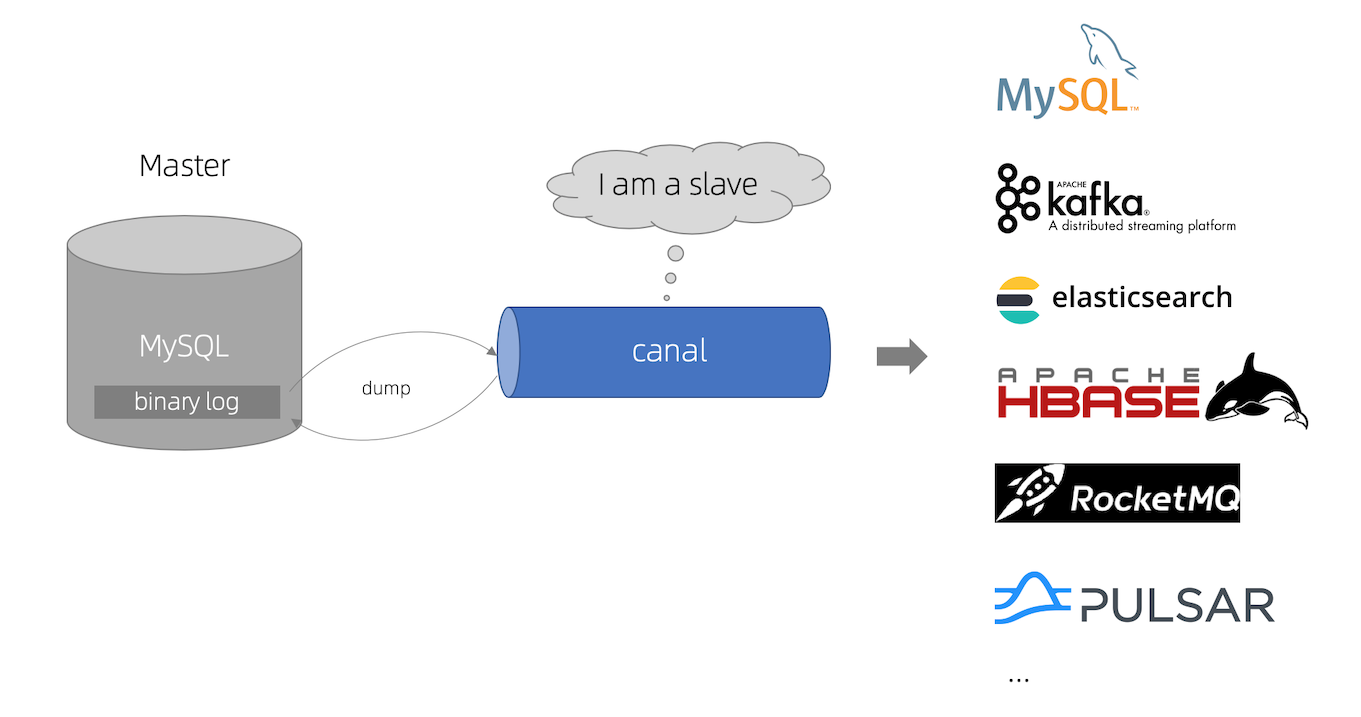
canal使用
canal的各个组件的用途各不相同,下面分别介绍下:
canal-server(canal-deploy):可以直接监听MySQL的binlog,把自己伪装成MySQL的从库,只负责接收数据,并不做处理。
canal-adapter:相当于canal的客户端,会从canal-server中获取数据,然后对数据进行同步,可以同步到MySQL、Elasticsearch和HBase等存储中去。
canal-admin:为canal提供整体配置管理、节点运维等面向运维的功能,提供相对友好的WebUI操作界面,方便更多用户快速和安全的操作。
组件下载
wget https://github.com/alibaba/canal/releases/download/canal-1.1.5/canal.deployer-1.1.5.tar.gz
wget https://github.com/alibaba/canal/releases/download/canal-1.1.5/canal.adapter-1.1.5.tar.gz
wget https://github.com/alibaba/canal/releases/download/canal-1.1.5/canal.admin-1.1.5.tar.gz
本次部署使用软件版本
| 软件 | 端口 | 版本 | 地址 |
|---|---|---|---|
| MySQL | 3306 | 5.6 | 192.168.1.11 |
| Elasticsearch | 9200 | 7.17.2 | 192.168.1.11 |
| canal-server | 11111 | 1.1.15 | 192.168.1.11 |
| canal-adapter | 8081 | 1.1.15 | 192.168.1.11 |
| canal-admin | 8089 | 1.1.15 | 192.168.1.11 |
| elasticsearch-head | 9100 | 192.168.1.11 |
MySQL配置
canal是通过MySQL的binlog来实现数据同步的,我们需要配置以下参数
[mysqld]
***
log-bin=mysql-bin
binlog_format=row
***
创建拥有从库权限的帐号,用于订阅binlog
GRANT REPLICATION SLAVE, REPLICATION CLIENT ON *.* TO 'canal'@'%' identified by 'canal';
创建同步测试的表
create table test.`test` (
  `id1` varchar(128) default null,
  `id2` varchar(128) default null ,
  `uuid` varchar(128) default null
) engine=innodb;
canal部署
创建canal统一文件夹(不喜欢可以自己指定)
[root@test opt]# mkdir /opt/canal
canal-server
[root@test opt]# tar -xf canal.deployer-1.1.5.tar.gz -C /opt/canal
[root@test opt]# cd canal/deployer/
[root@cdh-01 deployer]# ll
总用量 8
drwxr-xr-x 2 root root   88 4月  20 16:21 bin
drwxr-xr-x 5 root root  117 4月  20 15:30 conf
drwxr-xr-x 2 root root 4096 4月   7 10:28 lib
drwxrwxrwx 4 root root   32 4月  20 14:33 logs
drwxrwxrwx 2 root root 4096 4月  19 2021 plugin
[root@test deployer]# vim conf/example/instance.properties
修改配置文件conf/example/instance.properties,主要是修改数据库相关配置
# position info
canal.instance.master.address=192.168.1.11:3306 ##数据源地址
***
# username/password
canal.instance.dbUsername=canal
canal.instance.dbPassword=canal
canal.instance.connectionCharset = UTF-8

[root@test deployer]#
canal-server服务启停
[root@test deployer]# sh bin/startup.sh
[root@test deployer]# sh bin/stop.sh
canal-server日志查看
[root@test deployer]# tail -f logs/example/example.log
看到以下内容,则部署成功
find start position successfully, EntryPosition[included=false,journalName=binlog.000332,position=410818705,serverId=1,gtid=,timestamp=1650439858000] cost : 742ms , the next step is binlog dump
canal-adapter
[root@test opt]# tar -xf canal.adaptor-1.1.5.tar.gz -C /opt/canal
[root@test opt]# cd canal/adaptor/
[root@test adaptor]# ll
总用量 20
drwxr-xr-x 2 root root   90 4月  21 16:13 bin
-rw-r--r-- 1 root root  264 4月  21 17:00 chaoyang.yml
-rw-r--r-- 1 root root  211 4月  21 16:25 chaoyang_zy.yml
drwxrwxrwx 8 root root 4096 4月  21 17:31 conf
drwxr-xr-x 2 root root 4096 4月   7 11:09 lib
drwxrwxrwx 3 root root   20 4月   7 16:27 logs
drwxrwxrwx 2 root root 4096 4月  20 19:27 plugin
修改配置文件conf/application.yml,主要修改canal-server配置、数据源配置和客户端适配器配置
[root@test adaptor]# cat conf/application.yml
canal.conf:
  mode: tcp # 客户端的模式,可选tcp kafka rocketMQ
  flatMessage: true # 扁平message开关, 是否以json字符串形式投递数据, 仅在kafka/rocketMQ模式下有效
  zookeeperHosts:    # 对应集群模式下的zk地址
  syncBatchSize: 1000 # 每次同步的批数量
  retries: 0 # 重试次数, -1为无限重试
  timeout: # 同步超时时间, 单位毫秒
  accessKey:
  secretKey:
  consumerProperties:
    # canal tcp consumer
    canal.tcp.server.host: 192.168.1.11:11111 #设置canal-server的地址
    canal.tcp.zookeeper.hosts:
    canal.tcp.batch.size: 500
    canal.tcp.username:
    canal.tcp.password:
  srcDataSources: ##数据源
    defaultDS:
      url: jdbc:mysql://192.168.1.11:3306/test?useUnicode=true
      username: root
      password: *****
  canalAdapters:  ##适配器,用es7
  - instance: example # canal instance Name or mq topic name
    groups:
    - groupId: test1
      outerAdapters:
      - name: logger
      - name: es7
        hosts: 192.168.1.11:9200 # 127.0.0.1:9200 for rest mode
        properties:
          mode: rest # or rest
          # security.auth: test:123456 #  only used for rest mode
          cluster.name: my-application
添加配置文件/opt/canal/adapter/conf/es7/test.yml,用于配置MySQL中的表与Elasticsearch中索引的映射关系
[root@test adaptor]# cat conf/es7/test.yml
dataSourceKey: defaultDS # 源数据源的key, 对应上面配置的srcDataSources中的值
destination: example # canal的instance或者MQ的topic
groupId: test1 # 对应MQ模式下的groupId, 只会同步对应groupId的数据
esVersion: es7
esMapping:
  _index: test # es 的索引名称
  _id: id2 # es 的_id
  sql: "SELECT concat(a.id1,'::',a.id2,'::',uuid) as id2,concat(a.id1,'::',a.id2) as id,a.uuid FROM test a "   # sql映射
  etlCondition: "where a.id2= {} order by a.id1 desc,a.id2 desc"  #etl的条件参数
  commitBatch: 3000  # 提交批大小
canal-adapter服务启停
[root@test adaptor]# sh bin/startup.sh
[root@test adaptor]# sh bin/stop.sh
查看服务日志信息;
[root@test adaptor]# tail -f logs/adapter/adapter.log
看到以下内容,则说明部署成功
=============> Subscribe destination: example succeed <=============
elasticsearch部署
elasticsearch下载
[root@test opt]# wget https://artifacts.elastic.co/downloads/elasticsearch/elasticsearch-7.17.2-linux-x86_64.tar.gz
配置环境变量
[root@test opt]# vim /etc/security/limits.conf
# 配置进程 和线程数
*  soft nproc 131072
*  hard nproc 131072
#配置 文件句柄数
*  soft nofile 65536
*  hard nofile 131072
#配置 内存锁定交换
*  soft memlock unlimited
*  hard memlock unlimited
[root@test opt]# vi /etc/sysctl.conf
#禁用内存与磁盘交换
vm.swappiness=1
#设置虚拟机内存大小
vm.max_map_count=262144
执行 sysctl -p 使用配置生效
[root@test opt]# sysctl -p
创建elasticsearch用户(es不允许 root用户启动 )
[root@test opt]# useradd elasticsearch
解压软件 elasticsearch-7.17.2-linux-x86_64.tar.gz
[root@test opt]# tar -xf elasticsearch-7.17.2-linux-x86_64.tar.gz -C /home/elasticsearch
[root@test opt]# chown -R elasticsearch: /home/elasticsearch/elasticsearch-7.17.2
配置
[root@test opt]# su - elasticsearch
[elasticsearch@test ~]# cd elasticsearch-7.17.2
[elasticsearch@cdh-01 elasticsearch-7.17.2]$ vim config/elasticsearch.yml
cluster.name: my-application
node.name: node-1
path.data: /home/elasticsearch/elasticsearch-7.17.2/data
path.logs: /home/elasticsearch/elasticsearch-7.17.2/logs
bootstrap.memory_lock: false
network.host: 192.168.1.11
cluster.initial_master_nodes: ["node-1"]
http.cors.enabled: true
http.cors.allow-origin: "*"
启动es
[elasticsearch@cdh-01 elasticsearch-7.17.2]$ ./bin/elasticsearch #不报错就运行成功
##[elasticsearch@cdh-01 elasticsearch-7.17.2]$ ./bin/elasticsearch -d ##后台运行
浏览器输入192.168.1.11:9200,验证es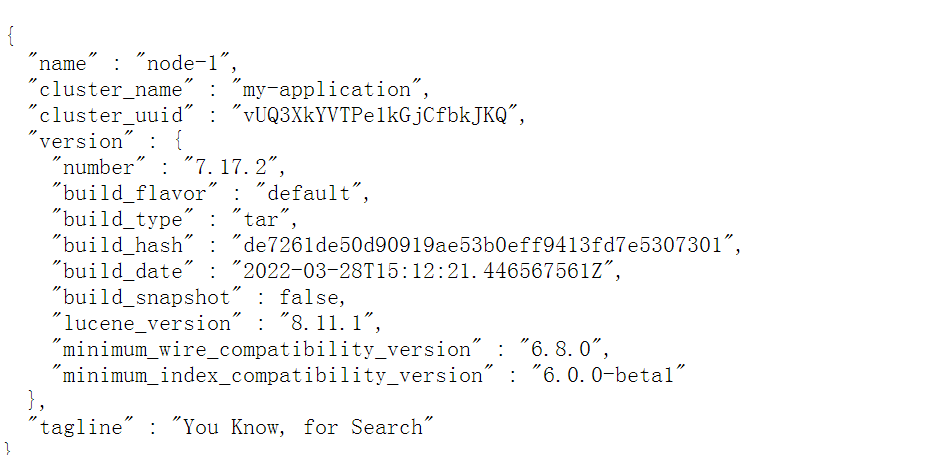
elasticsearch-head部署
elasticsearch-head是elasticsearch客户端
软件下载,安装
[root@test opt]# wget https://github.com/mobz/elasticsearch-head/archive/master.zip
[root@test opt]# unzip master.zip
[root@test opt]# cd elasticsearch-head-master/
[root@test elasticsearch-head-master]# mkdir node_modules
[root@test elasticsearch-head-master]# cd node_modules
[root@test node_modules]# npm install -g grunt-cli
[root@test node_modules]# grunt -version
修改配置文件
[root@test elasticsearch-head-master]# vim Gruntfile.js

*****
                connect: {
                        server: {
                                options: {
                                        port: 9100,
                                        hostname: '*',
                                        base: '.',
                                        keepalive: true
                                }
                        }
                }
*****
[root@test elasticsearch-head-master]# vim _site/app.js
*****
this.base_uri = this.config.base_uri || this.prefs.get("app-base_uri") || "http://localhost:9200";
*****
[root@test elasticsearch-head-master]# npm install
如果报错,请执行
[root@test elasticsearch-head-master]# npm install phantomjs-prebuilt@2.1.14 --ignore-scripts
启动程序
[root@test elasticsearch-head-master]# grunt server
浏览器输入192.168.1.11:9100,出现es客户端页面
kibana部署
软件下载+安装
[root@test opt]# wget https://artifacts.elastic.co/downloads/kibana/kibana-7.15.2-linux-x86_64.tar.gz
[root@test opt]# tar -xf kibana-7.15.2-linux-x86_64.tar.gz
修改配置文件
[root@test kibana-7.15.2-linux-x86_64]# vim config/kibana.yml
server.port: 5601
server.host: "0.0.0.0"
elasticsearch.hosts: ["http://192.168.1.199:9200"]
kibana.index: ".kibana"
启动服务
[root@test kibana-7.15.2-linux-x86_64]# ./bin/kibana --allow-root
浏览器输入:192.168.1.11:5601
增量数据同步演示
创建es索引: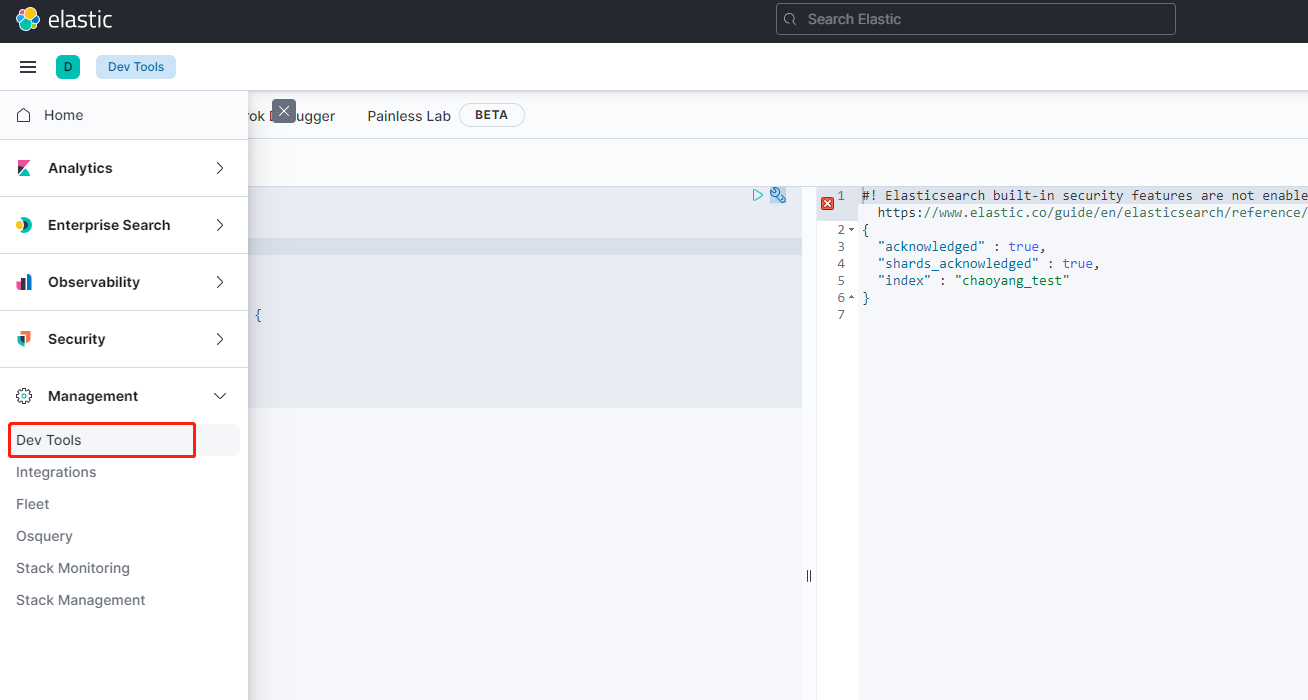

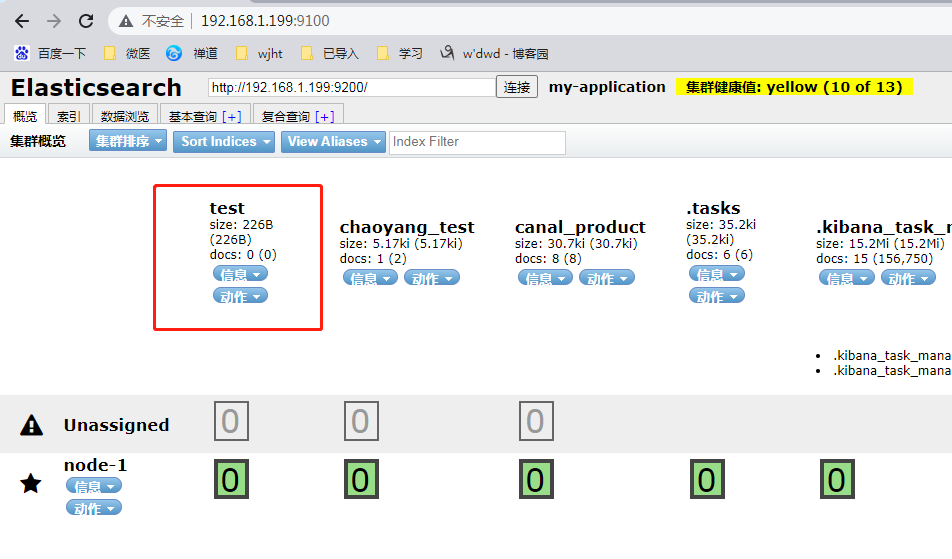
在源数据库中插入一条数据:
insert into test.test (id1,id2,uuid) values('test1','test2',uuid())
然后在192.168.1.11:9100页面中查看test索引数据是否录入成功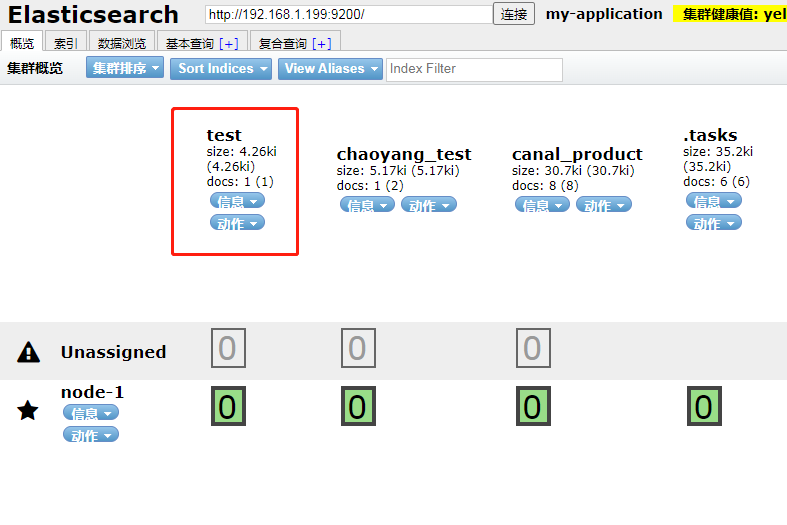
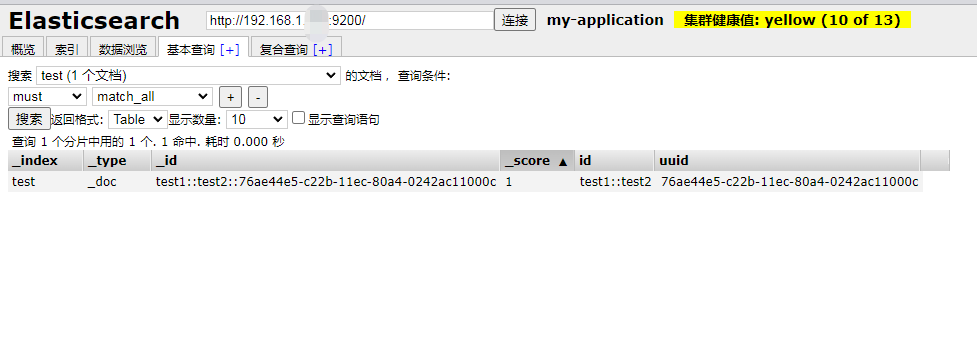
或者查看日志
[root@test adaptor]# tail -200f /opt/canal/adaptor/logs/adapter/adapter.log

历史数据同步测试
如果需要将表内历史数据同步至es
执行命令
curl http://192.168.1.11:8081/etl/es7/test.yml -X POST -d "params=2"
#params为导入数据条件参数,对应/opt/canal/adapter/conf/es7/test.yml中:
etlCondition: "where a.id2= {} order by a.id1 desc,a.id2 desc"
执行完成后,adaptor日志中提示:
[root@test adaptor]# tail -200f /opt/canal/adaptor/logs/adapter/adapter.log
2022-04-22 10:01:01.316 [http-nio-8081-exec-5] INFO  c.a.otter.canal.client.adapter.es7x.etl.ESEtlService - 数据全量导入完成, 一共导入 120 条数据, 耗时: 81